The issue detail page is where you read and update information about an issue. You can open the issue detail page using any of these methods:
- Find a link to the issue on one of the lists on the Dashboard.
- Conduct a search for the issue. On the search page, enter keywords and other criteria that the issue will match, including the Issue ID if you know it. Choose the link to your desired issue from the search results table.
- Click a link to the issue in an email sent to you by Squish.
- Depending on project and personal settings, Squish may send you emails when issues that are assigned to you or on your watch list are updated. This email will contain a link to the issue detail page. If your email software does not support links, you can copy the URL from the text of the email and paste it into your browser window. If you are not already logged in to Squish, you will be prompted for your username and password first, but you will go directly to the issue detail page once you enter them.
Issue Action Bar

The options on the action bar allow you to interact with the whole issue, either by modifying it, following changes made to it, or by emailing other users in relation to it. The buttons and menus displayed will change depending on the role(s) the member viewing the issue has. Some additional tools are available to Project Administrators. The possible options are:
| Link |
Description |
| Comment |
Select this option to take you directly to the open Post a Comment field. |
|
Watch/Unwatch
|
Watch adds the issue to your watch list and Unwatch removes the issue from your watch list.
|
|
Email
|
Select this option to send a message to other project members. The dialog that opens contains a checkbox to BCC email recipients, a free text message field, and a dropdown to select users and/or groups to email. A Group Members button opens another dialog where you can view the members of each group, if that group is configured to allow members to be viewed.
|
|
Notifications
|
If you would like to send an automatic email when you update the issue, click Notify and enter names of the project members you would like to notify. The same people will be automatically notified each time you update that issue. You can remove selected members by clicking the "X" next to their name.
|
|
More
|
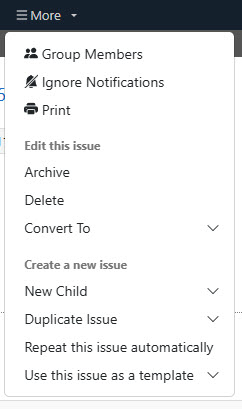
Opens a dropdown menu with several additional actions available, depending on user permissions.
|
|
More > Group Members
|
Opens a dialog which displays the members of groups in this Squish project, if a Project Administrator has configured the list to be public.
|
|
More > Ignore Notifications / Allow Notifications
|
Use this tool to control the email notifications that you receive related to this specific issue.
|
|
More > Print
|
Opens a printer-friendly version of the issue. When printed, the file name will be in the following format: [Project name] _ [Company name] _ [Issue number] [Issue title] - Print - Squish
|
|
More > Hide History/Show History
|
Click Hide History to not display the changes that have been recorded for the issue. Click Show History to display the changes that have been recorded for the issue. The changes are displayed beneath the user names. Large Text fields are collapsed by default. Clicking the Show button displays the history for these fields.
|
|
More > Archive
|
Only members who have roles that have permissions to delete issues for the current Issue Type can see this tool.
Archiving an issue will remove it from Squish, while maintaining a separate copy of the issue which is available to Project Administrators for up to 180 days. This feature may be turned off by Project Administrators.
|
|
More > Delete
|
Only members who have roles that have permissions to delete issues for the current Issue Type can see this tool.
- Click Delete and then Delete Issue to confirm to remove an issue permanently from the project. Click Back to Issue to not delete the issue. Deleting an issue is permanent.
- If other issues include the deleted issue number as a value for a field with an Issue Type of “Issue”, then it will be removed upon deletion. History of that field’s value is retained for reference.
|
|
More > Convert To
|
Members who have the corresponding role permission can change issues from one issue type to another. Select the appropriate issue type to change the current issue to.
|
|
More > New Child
|
If the Parent ID field is active and displayed, this option allows you to create a related (new) child issue from an existing issue.
- Select New Child, then select an issue type for the new issue. A new issue submit page will open.
- The Parent ID field on the new issue submit page will display the existing issue's ID by default.
|
|
More > Duplicate Issue
|
This tool includes a dropdown list of Projects for which you have the ability to create issues.
- Selecting a Project opens the new Duplicate Issue page, which lists the fields in the original issue, the values the original issues had for those fields if they are present in the new issue Project, and a drop-down selector for the field in the new project to which that value should be mapped. The drop down is defaulted if a corresponding field in the new project is detected by Squish.
- After selecting the new fields, click the Check Conflicts button. A Resolve Conflicts page will open. Choose the appropriate value from the drop down for any conflicting values. Squish may select a matching value by default.
- If needed, check the Include link to the duplicated issue in the description box.
Select Duplicate Issue.
|
|
More > Repeat this issue automatically
|
This tool allows you to use the current issue as a template to create an automatically recurring issue of the same type.
|
|
More > Use this issue as a template
|
This tool includes a dropdown list of active Issue Types. Selecting an Issue Type opens the new issue submission page with field data defaulted to match the existing issue, where possible. This includes the Description and any other fields available on the New Issue Submit page, but not any attachments . Other values may be defaulted based on the Issue Type.
|
| Workflow |
If there are workflows associated with an issue, then workflows which you can currently perform on the issue will be available for selection. The fields that are being prompted for will be displayed as well as a Comment field. Fill in any required fields, post any comments you have and click Update Issue. |
Project Fields
Project fields are displayed based on the administrator configured settings, either on the right side of the screen, above the initial comment, or below the initial comment. The fields will vary depending on whether the member viewing the issue has a role with permission to view the fields. Fields will only be editable if the member has a role with permission to edit the fields.
Under the issue’s Subject and ID, several badges give a quick overview of the issue. The Issue Type, Status, Date Entered, and Date Modified values are displayed. Additionally, a list of all issues from any company project that are linked to the current issue is available. This includes issues linked via a specific project field, such as Parent Issue, as well as issues that are referenced in comments. Any issues with a Status value marked as “Resolved” will be appended with “(Resolved)” in this section and in comments, unless they were linked to the current issue by URL rather than via the issue formatting tag. Project managers determine which statuses are Resolved for each issue type.
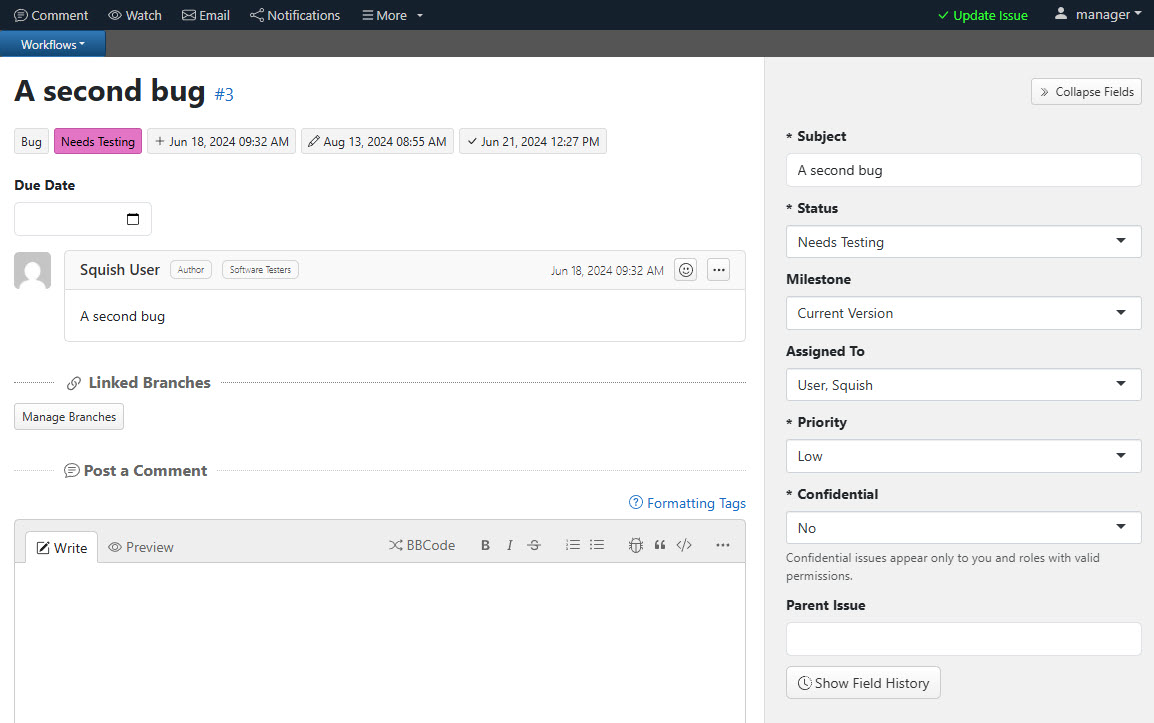
A button to Collapse Fields is available at the top of the field section on the right side of the screen. At the bottom of the same section is a Show Field History button, if there is any field history beyond the initial issue submit. Click the button to see a table of the changes that have occurred in the fields where history is recorded. Recording of history is set when adding or editing a field.
Additionally, there is a Show all Attachments button. Selecting the button opens a dialog which displays links to all attachments in the issue. From this dialog, you can select individual attachments to download them or use the Download All button to download a zip file containing all attachments. The zip file name will include the project name and issue number. Attachments uploaded in confidential comments will only be downloadable for users whose accounts are assigned the permission to view confidential comments.